
By Marci who puts our mini car right where we will trip on it and always drives it into walls.

Note: this is for the 2019 models we currently have. There may be slight changes from time to time, but those will be in the manual that comes with your car.
One of these days I am going to rewrite the entire manual in a way we can all understand, but for today, I have pictures of a few pages and will share a bit about the basic operational features. Since this is about to be a longer more mundane post you might want to just use for reference, let’s look at this cute review video first.
I really love the charger. I expected something cumbersome and annoying, but instead, it was small, easy, and plugs right into the charging port as you can see on the lower left. The car charges pretty quickly, although we think a backup battery may be helpful to you so you can switch them throughout the day.
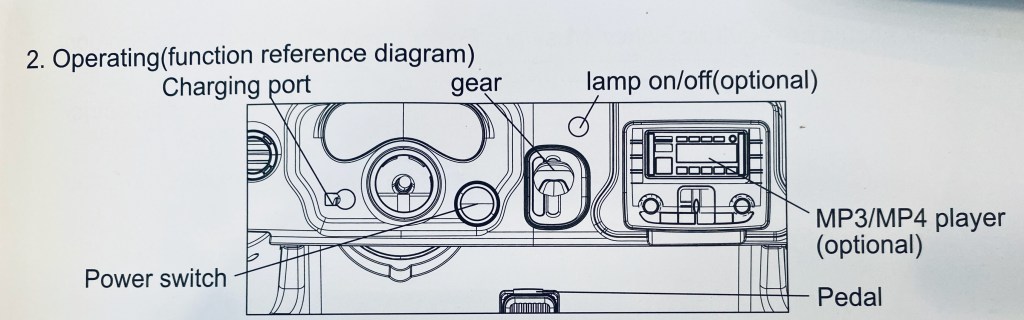
All charged up? Then you’re ready to go. Your driver can just put on a seat belt, press the big start button to the lower right of the steering wheel, and push the pedal to the non-metal. Most of these start buttons are labelled “Engine Start Stop” and should be easy to find even if the labels change as we get new models. The dash will light up as the engine “roars” and you can do a test of the horn on the steering wheel if you like. We generally leave our lights in the on position, but that is your prerogative. You may want to leave them off for startup. The gears from top to bottom are Drive 2, Drive 1, Park, and Reverse. Drive 1 will be your slower gear and what you’ll most often use in a hospital setting,
A note about the speed: The cars generally operate from 2-5 miles per hour, with the slower speeds at Gear Position D1. Since humans generally walk at an average speed of 2.5 mph, the D1 slower speed should work best in most cases. However, the more weight or the more difficult the terrain (if you are using it outdoors), the slower it will go. So if you have an older child or two children in it, it may go slower and these factors will also run down the battery faster. In my McGuyver mode, I would say to add some weight if you think it is going too fast, but I am sure this would not be the manufacturer’s suggestion, and you may want to consider battery time declining in this case. You can always reach out to me to find solutions as we get this driving party started.

The picture here of the MP3 /radio area looks more complicated than it really needs to be for all of us. Volume is fairly standard and has a scale of 1-30. If you’re testing it or using it without the MP3, the music button has about ten cute songs with classics like “Twinkle, Twinkle Little Star” and peppy instrumentals. Truthfully, I would skip the story mode – at least until I find a way to record over them, which I am saving for advanced mode 😉
The play pause button works in all of the different modes, as does the previous or next. To get your FM radio working, you’ll have to leave it on for 10-15 minutes the first time you start it up. This will scan area station so they’re ready to use in the future, so you’ll want to let them all come in before you turn off the car.
For the bluetooth MP3, just click the bluetooth button on the panel, then in your device’s bluetooth setting, select the option start with F – usually it’s 1-2 digits. For example, mine is F31. Then play music from the app of your choice. This is great, because if you have asked your patient for their favorite song, you can play it as they drive. <—- highly suggested tip
We will save the other options for later, because this covers what will be used most often. Also there are models with many more complex options we can explore at that time – those options have joke, poetry and alternate languages not available on our cars at this time,.
So now for the remote. If you watched the video above, you’ll see it is pretty simple to operate, especially if you’re good at video games. I seem unable to grasp the simple concept of driving a car in any style of game, so I usually ask others to drive the car for me.

In cases where I/we build the car, we will have already connected and tested the remote for you. If you are building the car, pairing the remote to the car is done with the code button as described in the picture above.
The button I think is the most important is the Stop button. This will stop the car in place and will not operate in manual or remote modes until turned off.
The speed indicator in the center shows 1 light for slow, 2 for medium and 3 for fast. For safety in the hospital setting, I suggest always using the car at the slowest speed. Then it is just the left hand for forward or reverse and the right for turning left or right. I know, it sounds simple, right? I still can’t do it.
These are all of the operations used the majority of the time. We would really like to hear your questions or comments below – you may be helping others by asking – or you can always reach out to us at our email MabelMotors4Kids@gmail.com or on our page.
One of these days, and by that I mean next Wednesday, we will have a post with a tad more fun – so stay tuned for our Akron Children’s Hospital test drive news – spoiler: it was great! Thanks and have a great day – Marci and Mabel.
